On my last post, in the very end, I showed you an example of something quite simple that you could do with PowerShell on the RaspberryPi: Show a notification when a LED is left ON.

In this post I will show you how I’ve managed to display the notification. This will consist of three sections:
- How to display a notification
- Enabling remote sessions through SSH
- The final script to display a notification from one device to another
Showing a notification 🔗
Because @WindosNZ #BurntToast module is awesome, I figured that there was something cool that I could do with it! And what's that? Get current temperature from my @Raspberry_Pi and receive the notification on windows10 machine. EVERYTHING using only #PowerShell pic.twitter.com/vJCEaoNMqi
— Daniel Silva (@DanielSilv9) October 14, 2018
The first time I’ve done something similar to this, I used the BurntToast to do the job. This time, because I am using Linux and because I want this to cover more scenarios, I’ll be using PoshNotify.
I could display the notifcation on the Raspberry itself, but because in this case I’m using it headless, I will display the notification on my machine instead. In order to achieve this, I need to do two things:
- Install the PoshNotify module
- Somehow establish connection with the machine and send the information
Install the PoshNotify module 🔗
Installing PoshNotify is like installing any other module available on the PowerShell gallery. Simply do Install-Module PoshNotify and you are ready.
After installing it, to see if it works, let’s send a simple notification:
Import-Module PoshNotify
Send-OSNotification -Title "This is a test" -Body "It has been successfully installed"
If everyting went smoothly, you should see a notification.

Configure SSH 🔗
Because we will use a PowerShell module to display the notifications, we need to have PowerShell installed on the machine that will do it. Assuming it is already installed, we need to configure the SSH server so that we can use PowerShell to establish remote sessions. What’s needed to achieve this can be found here for Windows, here for Linux and here for MacOS.
Invoke-Command cmdlet 🔗
In order to test if it’s working as expected, we will use Invoke-Command. Let’s see what Get-Help Invoke-Command gives us:
Invoke-Command [[-Session] <PSSession[]>] [-ScriptBlock] <scriptblock>
[-ThrottleLimit <int>] [-AsJob] [-HideComputerName] [-JobName <string>]
[-RemoteDebug] [-InputObject <psobject>] [-ArgumentList <Object[]>]
[<CommonParameters>]
Seems that it allows us to pass an array of sessions and a script block.
The PSSession Parameter 🔗
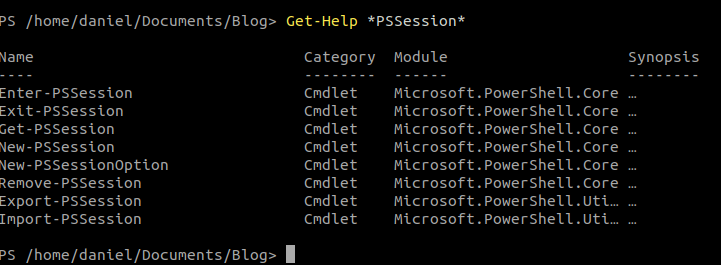
What can we do with PSSession? Get-Help *PSSession* gives us all the cmdlets with PSSession in the name

{: .box-note}
Note: Notice that in this case I’ve putted the PSSession between * so that I catch everything that has the word PSSession.
In this case, it seems that New-PSSession will do the job.
New-PSSession allows us to specify a hostname and a username.
Now that we know how to create a session, let’s try and run a command. Before we do anything with the Raspberry, let’s try it on our machine.
$session = New-PSSession -HostName localhost -Username "daniel"
$scriptBlock = {Get-Process}
Invoke-Command -Session $session -ScriptBlock $scriptBlock
If you run this, you should be asked to input your password and after you do that, you should see a list of processes currently running on your machine. We can also see that this worked, because we have a header that is the PSComputerName and in this case it is localhost, which matches the session we just created.

This is looking good! We can use remote sessions to execute scripts on another machine.
Test send a notification from Raspberry to our machine 🔗
Now that we have sucessfully installed and tested PoshNotify and have configured the SSH on the machine that will receive the notification, let’s test everything together - let’s send a notification from Raspberry to our machine. This is pretty much the same as we’ve done above, but instead of localhost, we will use our machine’s hostname (I like to use the IP address, since sometimes the computer name is not recognized for some reason I’m not aware of - I also know that this has the downside that sometimes the IP address can change, unless you give it a static address). Let’s jump to the Raspberry shell and do the following:
pwsh
#Uncomment the following line and change the parameters accordingly
#$session = New-PSSession -HostName "YourPCName or IP" -Username "yourUsername"
#In my case it is as follows
$session = New-PSSession -HostName "192.168.1.69" -Username "Daniel"
$scriptBlock = {
    Import-Module PoshNotify
    Send-OSNotification -Title "Remote notification" -Body "This notification has been sent from antoher computer"
}
Invoke-Command -Session $session -ScriptBlock $scriptBlock
Again, you will be asked to input the password of the TARGET machine. You should now successfully see the notification pop up on your computer.
The final script 🔗
The final script, for this case, is that what you can see on the initial screenshot. I’ll leave it here.
$session = New-PSSession -HostName "192.168.1.69" -Username "daniel"
$scriptBlock = {
    Import-Module PoshNotify
    Send-OSNotification -Title "LED" -Body "Someone left the led ON!"
}
if((Get-GpioPin -Id 8).Value -eq 'High'){
    Invoke-Command -Session $session -ScriptBlock $scriptBlock
}

Wrapping it up 🔗
Hopefully you were able to successfully follow everything we’ve seen here. If you have questions/comments/feedback, hit me up on twitter (at least until I have a “comments” section)
What’s next? 🔗
As you might have noticed, this script still requires improvement. As it is, it’s only working while on current powershell session (because of the session parameter). On a future post, we will see how we can schedule this to run every 1 hour (and we will also change what’s displayed to be something more useful). So stay tunned!
Thanks for reading!