Azure pipelines can be created through a GUI or through a YAML file. I will be focusing on the YAML instead of GUI for three main reasons:
- It is being favored over the GUI
- Allows to commit the YAML to a source control, thus allowing versioning
- Re-usability (will cover it in another post)
Schema of the YAML file 🔗
Microsoft docs has an extensive explanation about the schema and everything that is supported. This is my go-to when I have questions about schema/features.
Let’s start with the concepts. Here’s what I consider to be the “basic” structure of the YAML file:
trigger:
pool:
jobs:
  - job:
    steps:
    - task:
    - task:
  - job:
    steps:
    - task:
    - task:
Let’s break it down into what each element does:
- trigger: as the name implies, here you configure what will trigger your pipeline. The documentation has a lot of information, but in short, there are 4 trigger types: Push, Pull Request, Scheduled and Pipeline. Just this first element itself can be a blog post. For now, we can set this to “none”, meaning it will never be triggered (but you can call it manually).
- pool: Defines on which pool the pipeline should run. You can run on a Microsoft-Hosted pool or on a private pool. For now we will use the Microsoft-hosted pool, but on a future post we will see how to create our own, but if you are really curious, you can check my Using RaspberryPi as an Azure agent for Pipelines (Part 1) post.
- jobs: The pipeline can have multiple jobs. Unless stated otherwise (by using the dependsOn parameter), jobs run in parallel. Each job has steps, which are defined into one or many tasks
Project structure 🔗
For the sake of simplicity, let’s say we have a simple C# console application that outputs a greeting message given the user name as a parameter. You can find this project on my Azure DevOps project repository called AzDevOpsSeries
We don’t like broken things, so let’s add a simple unit test to make sure that the method is returning what’s expected.
The project structure is the following:
GreeterProject
|
|-----GreeterApp
|  |
|  |-----GreeterApp.csproj
|
|-----GreeterTests
|  |
|  |-----GreeterTests.csproj
Creating our pipeline 🔗
Since we want to keep our pipeline it in source control, let’s keep it within our project repository.
GreeterProject
|
|-----GreeterApp
|  |
|  |-----GreeterApp.csproj
|
|-----GreeterTests
|  |
|  |-----GreeterTests.csproj
|
|-----Pipelines
|  |
|  |-----Greeter.yaml
The goal for our pipeline is to restore, build, test and publish our GreeterApp.
Creating the YAML file 🔗
In order to keep this simple, we want to trigger the pipeline manually, and use one of the free Microsoft agents, in this case with Windows.
This can be achieved with the following:
trigger:
  - none

pool:
  vmImage: 'windows-latest'
In this case, the tasks have dependencies (we don’t want to publish without testing, etc), so we will use 1 job with multiple tasks.
Since we are using .NET, we will use the DotNetCoreCLI@2 task.
You can find more info on the docs, but here’s an example of how we can restore our project:
- task: DotNetCoreCLI@2
    displayName: 'Restore Greeter Project'
    inputs:
      command: restore
      projects: GreeterProject/GreeterApp/GreeterApp.csproj
      feedsToUse: config
      nugetConfigPath: ./nuget.config
- command: This is the command that you usually use within dotnet, such as build, test, etc
- projects: Specify the project, a list of projects or the sln to use (relative to the root of the repository)
- feedsToUse: In this case we have a nuget.config, so I select config
- nugetConfigPath: Path to the nuget.config, relative to the root of the repo
The last two inputs are only used for restore (or when using dotnet build without restoring first). Now all we have to do is to repeat these tasks for the proper commands we want to run.
Here’s the final result
I’ve used three “things” that you might not be familiar:
- $(buildConfiguration)
- $(Build.ArtifactStagingDirectory)
- task: PublishBuildArtifacts@1
The first two are variables. One will be defined by us (buildConfiguration), which will allow us to change between Debug and Release without the need to change the YAML and commit changes. The second is a predefined variable, which gives us the directory where our artifacts are published by default. Speaking of which, the artifacts are published (meaning they become available outside of the agent) by running the task mentioned in the third point.
Creating the actual pipeline 🔗
So far, what we’ve done was to define what our pipeline will do. But we need to create the pipeline that will run it.
- In Azure DevOps, navigate to the project and then go to Pipelines > Create Pipeline
- Since I’m using azure Repos on the same project, I’ll select that option
- Then select the respective repository
- And on the “Configure your pipeline”, select “Existing Azure Pipelines YAML file”
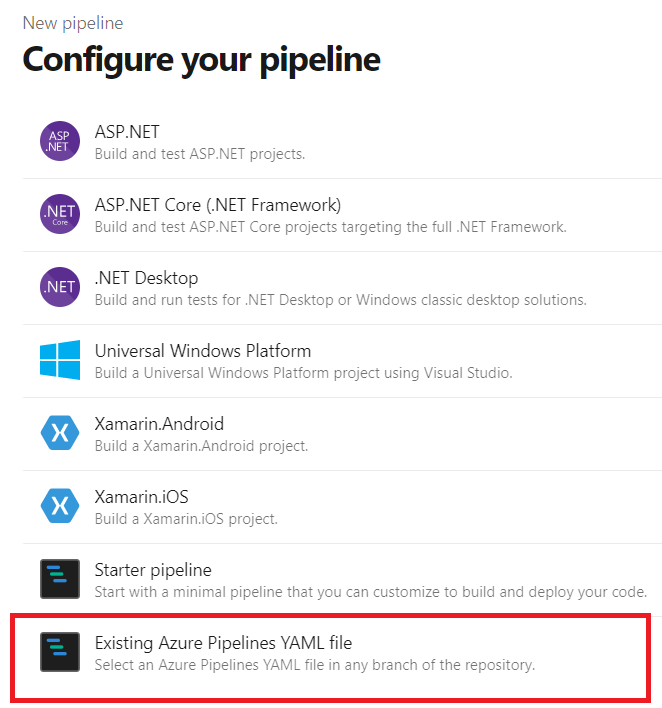
- Select the branch and path to your YAML file.
Now before saving and running it, remember that I mentioned that we will use the buildConfiguration variable? Add it by clicking on Variables > New Variable. It should look like this.
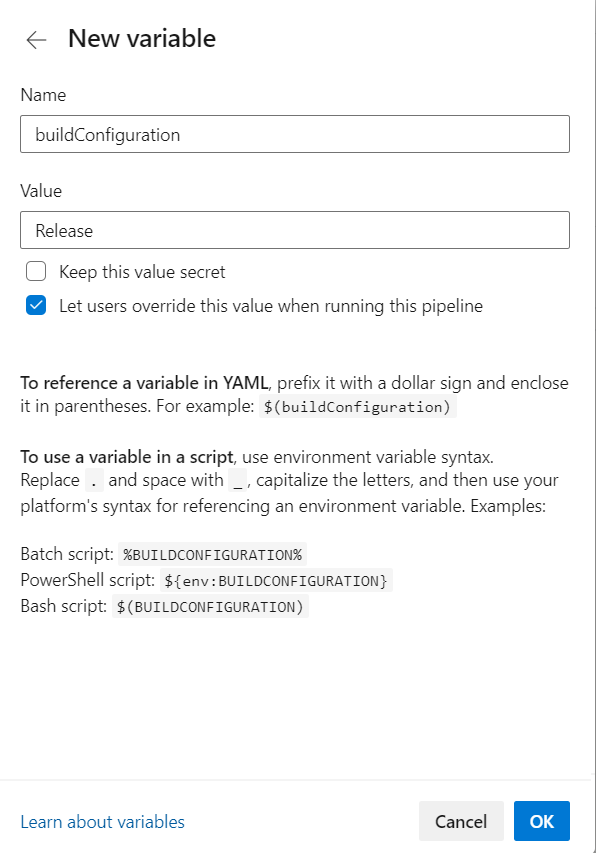
We want our pipelines to run with Release by default, so that’s the specified value. Also make sure to tick the “Let users override this value when running this pipeline” so that you can generate builds with Debug.
You can now save and run the pipeline.
After running the pipeline, if everything went as expected, you should see something similar to this:

Key points:
- 1 - Here you can see all the jobs that ran and drill down into each job
- 2 - Useful information regarding when did the pipeline started and what was its’ duration
- 3 - The published artifact. In this case it will be the zip of the GreeterApp
- 4 - Test results and code coverage. I’ll dedicate a post just for the code coverage part.
Wrapping up 🔗
In this post, I’ve shared with you how to define a pipeline through YAML, as well as setting it up on Azure DevOps and running it.